It’s always hard for me to think of what I want for Christmas. It’s much easier to think of gifts for other people. So today I’m going to present the Christmas / Holiday gift list for someone who’s making videos with their iPhone. Many of the links below are affiliate links to products I think are awesome!

A new iPhone 7 Plus
If you’re in the market for a new iPhone, the iPhone 7 Plus would be my choice! I haven’t personally played with an iPhone 7 Plus, but the “killer feature” is the 3rd camera – and the effect it will have on your videos. Prior to this release, you needed to have a DSLR to get that pretty deep depth-of-field look that’s common on movies and TV. It’s where the background is blurred out, but the subject is in focus. Seems minor, but it makes a big difference in terms of looking professional. The smaller size iPhone 7’s don’t have this third camera, so you should be looking at the bigger Plus versions if you want this feature.
Once you have an iPhone or iPad, you’re ready to shoot video. But there are a couple upgrades that will vastly improve your shots.
Stabilization
Shaky videos aren’t fun for viewers to watch. If you’re using snapchat or Facebook Live, you can get away with some shake. But if you want to look professional or your shooting for Instagram or YouTube, you need to stabilize your camera. There are a number of ways to stabilize – here are my favorites:

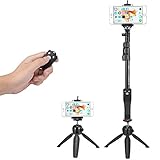
Better looking hand held shooting with the iOgrapher Filmmaking Case $60. I met David last time I was in LA – I saw him using this case and had to ask him what it was. Turns out he invented it! There’s a different one for each iPhone / iPad, so be sure to order the correct one (and some come as kits with a lens.) This mainly does three things: 1) it moves your hands further from your phone, so you get less shake. 2) it allows you to easily attach accessories like lenses, microphones and lights to your iPhone. 3) it works as a phone holder if you want to use a tripod.
- Selfie sticks have gotten a bad name lately – being banned from Museums and even Disney World.
But they are still a great tool for the iPhone videographer. Just adding a selfie stick will remove some of the shake from your videos. But you can also use a couple tricks to make your video still look hand-held, but look very professional. The first is to rest the end of the selfie stick on a table – like a monopod. This will remove more than 50% of the movement. You can also hold the end of the selfie stick against your body, angled out at 45 degrees from your belt. Or you could invest in a selfie stick that has a built in tripod. This last idea seems ideal to me. Lastly, you can get a selfie stick with a remote for starting and stopping the video – which will save you time on editing. My preference, the Accmor Tabletop Selfie Stick. $40.
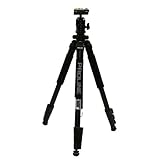
Tripods are pretty much the standard for holding camera’s steady. If you’re using an iPhone to record yourself, then you don’t need a fancy tripod. If you’re a filmmaker using an iPhone and you have a camera person who is going to pan or move the camera during a shoot, you probably need a video tripod. But most of my readers are creating simple videos, so I’m just going to talk about simple tripods. The only important thing (besides being sturdy) is the height. You want it to reach your eye level when you are on camera. This shouldn’t be a problem if you are sitting down – but I suggest standing. And if you are six feet tall, you’ll need a taller tripod. I like the Dolica 62″ Tripod $50 for shorter people / people who are sitting. Or the Amazon Basics 70″ Tripod $65 for taller people.
And you’ll need something to connect your iPhone to your Tripod. If you already have a selfie stick, you may be able to remove the mount from that and use it on a tripod, but if not, I recommend the Mudder Mount $7.
Sound
Once you have your camera stable, the next thing to improve is the sound

I suggest using a lavalier microphone – but you need one designed for a smartphone. A lavalier clips to your lapel (or you can hide it under your shirt, close to your mouth.) Depending on your budget, you can invest in the $15 Movo or the $80 Rode SmartLav+. I can’t tell much of a difference, but other people tell me they can hear it. And if you want to get further from your subject, or just have more flexibility, you can get a 20 foot long extension cable for $6.
- If you are filming in a home studio, and there’s an echo, I suggest adding some sound-deadening foam. You can get these for the walls, and these for the corners. I use Command Strips (and I gorilla glued the strips to the foam) to hold them to the wall without damaging the wall.
Lighting
There are many ways to mess up lighting. Not having enough light. Not having the light coming from the right direction. Having the light behind you… But there are great tools to make sure lighting is flattering.
If you have a spot in your home or office where you regularly record videos, then it’s probably a good idea to purchase an inexpensive two-light kit. Ideally you can use natural light coming from a window, but for those times when the sun is at the wrong angle, it’s dark and rainy, or you need to record at midnight, a light-kit will save your shoot.

Cowboy Studio is my favorite brand of lighting for non-professional use. It’s light duty, but high quality. I suggest most people start with a two light kit $50. This is simple to set up, with light stands, bulbs and umbrellas included. Upgrade one of the lights to a brighter bulb ($15) to make you look even better.
- If you’re in the market for something more robust (and you have a dedicated space where you can leave these set up – they take a long time to setup/break down) I recommend this two light kit $140.
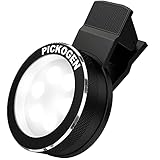
If you’re just shooting simple video with your iPhone or Webcam, having a small clip on light can really improve your look. I’ve been using this battery powered clip-on light ($18) and it’s working great. It recharges thru your USB port (and you can leave it plugged in to keep it bright for many hours.
More Gift Ideas
There are lots of other great toys for the videographer in your life – or toys that you can add to your wish list. Maybe a teleprompter? Backdrop and Stand? Maybe some lenses to spice up your videos. Maybe you are ready to graduate to a DSLR?
If there’s something on your wish list that I failed to mention, add it to the comments below! And feel free to share this page with your loved ones and let them go crazy showering you with everything you need to make professional iPhone videos.
And if this post was overwhelming – here’s my Basic iPhone Video Creators Gear List.
And if you’re looking for basic gear for your Android device (hint hint: it’s pretty much the same) you can find that Android Gear List over here.
Well, Your blog is so impressive! I believed that it was truly near to the need of iPhone Video Equipment. Actually, we also do the same job, if you want to know more information then visit our website: http://www.smartvideo.media
Thanks for sharing such a valuable things.