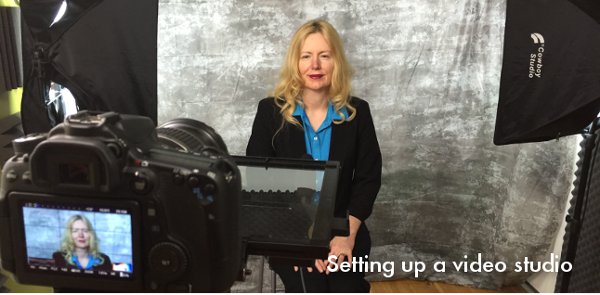
Do you want to make professional looking videos at home? Then you need some sort of recording space. This post will cover all you need for setting up a video studio in your home or office.
Your video recording space could just be your desk or it could be a dedicated video studio. My wife and I recently moved to Los Angeles for a month, rented an Airbnb and set up a studio in the spare bedroom. If you aren’t ready for a whole studio – that’s OK – you can apply all of this knowledge to your “desk-studio.” Good lighting and audio, lack of distractions, camera placement, etc. are universal whenever you are talking to your audience on video – so even if you don’t have a dedicated space – you can adapt these lessons.
Many links in this article are affiliate links – I earn a small commission if you make a purchase from these links. I never recommend products I don’t believe are top-notch! Thanks for you support!
I’d love to talk to you about setting up your studio. I’m offering a free 20 minute Skype chat, just pick a slot from my online calendar and call from your future studio. We’ll turn on the video and discuss options.
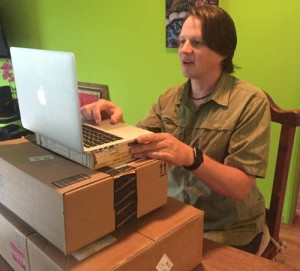
Evaluating my new home for a studio space
When we booked our Airbnb, we choose one with a spare bedroom that looked like a good studio location – but that was based on just a couple photos. When we arrived I recorded my first thoughts on creating a studio in this house. Check out the video to see the things I was thinking about as I evaluated the house.
Making sure your space sounds good
Audio is more important than any beginner imagines. Most filmmakers will tell you that good audio is more important than good video. You’ll want clear audio – so you’ll need a decent microphone. I put together a gear list that you can download – and it includes three levels of equipment from basic to advanced.
You’ll also want to avoid background noise like barking dogs and music. A bit harder to understand is acoustics. So I created this short video to give you a feel for the acoustics of each room of my house.
Setting up the studio
Once you’ve chosen a location based on lighting, sound, comfort and accessibility, you’ll need to get some equipment and set up your studio. Ideally, you’ve found a location where you can keep your equipment set up between shoots – this makes it easier to pop into the studio and record a quick video. But I worked for years without a dedicated studio – so it’s not a necessity. Next is my timelapse video showing the transformation from bedroom to DIY video studio.
If you’re starting to plan out your home video studio (or desk-studio) below are the steps I recommend.
- Choose your camera
- Choose a background
- Choose your lighting
- Set up the camera
- Choose your microphone
Five steps to setting up a video studio:
Step One: Choose your camera
The first thing to do when setting up a studio is decide what you’ll be using for a camera. There are three common camera that coaches use to create online video: Webcams, Smartphones or DSLRs/video cameras. I’ll list the pros and cons of each – and also let you know when I choose each one depending on the type of video.
 Webcam
A webcam is a camera that is built into your computer, or an external device that plugs into a USB port.
Pro:
Webcams easy to use
They record sound and video together
You probably already own one – maybe built into your laptop
Con:
Webcams are usually lower in quality than the cameras in smartphones or video cameras
They usually don’t have an optical zoom – and they are really wide angle. So you need to sit very close to your webcam, or digitally zoom the camera (decreasing the clarity of the image)
When would I use this camera: When I am broadcasting live video via Blab, Skype or Zoom. I’m able to set up my laptop below the camera so that I can see the other participants. This allows me to use my laptop or desktop computer, which is easier than managing these services on my iPhone and doesn’t require a tripod.
Smart Phone
Pro:
Smart Phones are easy to use
The cameras are higher quality than a webcam
They record sound and video together
You probably already own one
They are always with you – so there’s no need to remember extra gear
You can purchase lens and microphone accessories to improve your videos
Con:
Slightly harder to edit than a webcam (you can either download the files to your computer or use an app on your phone.
Easy to handhold – and then look unprofessional
When would I use this camera: When I want good quality videos, quickly. If I’m outside my home, I almost exclusively use my iPhone to record my videos. It’s very convenient and simple to use. I usually carry a lavalier microphone with me to get better audio on my iPhone.
 DSLR
DSLR
Pro:
Gorgeous high quality video
Many accessories available like zoom lenses, external microphones, filters, etc.
Con:
Bad audio (so you need to have a separate audio recorder.)
Difficult to use (many manual settings, and the need to manage files for editing.)
Expensive
Video length is limited (as low as 12 minutes on certain models.)
When would I use this camera: When I want top end videos that look and sound great (the bad audio forces you to use an external option that works better than the smartphone or webcam microphone options.) When I’m recording in a room without a backdrop and I want the background to be soft-focus so the viewer focuses on me. When I have the time and budget to spend time editing the video.
 Video Camera

Pro:
Relatively easy to use
Records good audio and video (depending on the model)
Potential to record very long videos
Cons:
Video quality is similar to an iPhone, but it can’t make phone calls or do 1000 other things.
When I (would) use this camera: I don’t own a video camera, but I would use a video camera if I were giving a speech and wanted to record it.
Step Two: Choose a background
You can buy different backgrounds and systems for hanging them behind you in your videos, but the easiest thing is to find a spot in your house that works. A white wall, an interesting pattern wall, a black wall (does anyone have one of these?) of even a natural background.
The natural background is usually the first choice for the “desktop studio.” If you choose a natural background, the most important thing is to really look at what you are showing your viewers. It’s easy to forget what’s behind you. No toilets, bright windows, wordy posters (words are really distracting) or children/pets. You can download my list of mistakes to avoid.

Pay attention to what’s behind you in your videos – no toilets, kids or wordy posters.
If you have a blank or patterned wall – that’s great – just make sure it’s big enough to work with your setup.
Make sure you have enough space – look through your camera as you are setting up. For example when I use my iPhone or Webcam I need to sit much closer to my camera, but a DSLR would need more distance from the camera to the subject. You should always have a few feet between you and the backdrop. Don’t stand against the wall like you are having a mugshot taken!

Standing against a wall causes a shadow to appear on the wall. Stand a few feet away to soften that shadow.
Step Three: Choose your lighting
It’s possible to get great video with just natural light. But often the natural light doesn’t work with the rest of your setup (eg. you can’t get the perfect light from a window without having a toilet in the background or the room with great light has awful sound.)
Three-Point lighting is the industry standard, so it’s good to have a basic understanding.
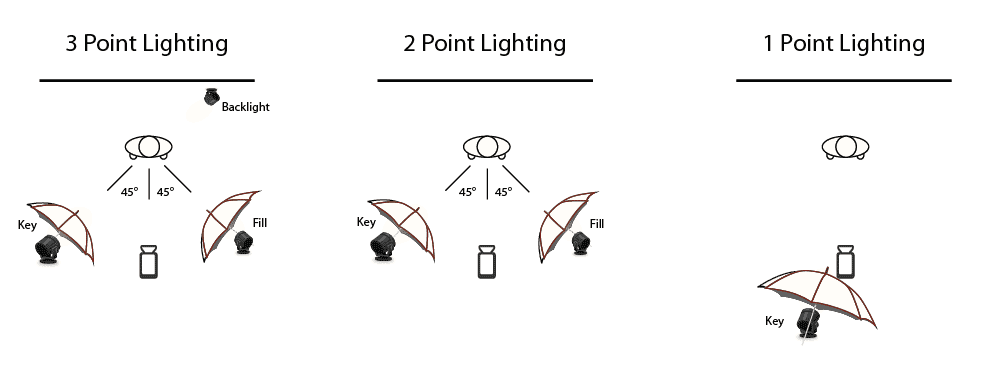
Examples of 3-point, 2-point and single point lighting
Ideally, you have one light coming from about 30 degrees above you and 45 degrees to your left (or right.) This is the brightest light and it’s called the key-light. The second light is about 30 degrees above you and 45 degrees to the right. This light is the fill-light and it’s about 50% as bright as the key light. The third light is coming from behind. It’s typically 70 degrees above you and directly opposite the key light.
A common variation is to turn the back light around and have it shine on the background directly behind the subject.
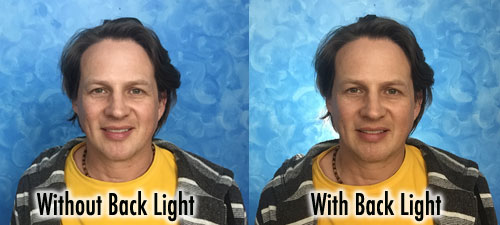
Adding a light between the subject and the backdrop helps to create separation and make video look more professional.
If you don’t have a backlight, the key and fill lights will still produce a good image. Just skip the backlight and set the key and fill as described above.
If you only have one light, you’ll need to do two things: first, move the light closer to the camera – maybe 15 degrees left or right of the camera. Then greatly diffuse the light – use a large umbrella or china ball so the light wraps around your face.
Common lighting mistakes:
Not diffusing the light – bare light bulbs cast unattractive light. Be sure to use something like an umbrella or china ball to diffuse the light.
Mixing light colors – lightbulbs vary from soft white to cool white. The difference is very clear on camera. Be sure to choose matching lights, and make sure your camera knows which you are using (important for a DSLR, but an iPhone or Webcam will automatically sense the proper color.)
Placing the lights too high or too low. Light naturally comes from overhead, so reproduce that in your studio. If you place the lights too high, your eye sockets will be dark. If you place the lights too low, you’ll end up with a spooky halloween look.
Step Four: Set up the camera.
The camera needs to be placed correctly to create a great image. What’s in the background? Anything in the foreground? What does the subject look like? Be sure to set the camera lens at eye level or slightly higher. Looking down on the lens is not attractive.
Prop up your laptop so the camera is at eye-level. Otherwise you’ll be looking down on your audience, and they’ll be looking up your noise (or at your double-chin.)
If you are using a webcam, it’s likely attached to your computer (although external webcams will give you a better image quality.) It’s very tempting to look down on the lens if you are using a webcam. If you are using a laptop, prop up the laptop to get the webcam at eye level or above. My favorite external webcam has a 1/4″ tripod mount built in, so I can use my tripod to easily set my camera exactly where I want it.
Stabilize your camera
If you are using a smartphone, you’ll want something to stabilize it. Holding your smartphone in your hand will create a distractingly shaky video. There are a couple ways to fix this. Ideally, you have a tripod and a smartphone adapter. If you are moving around or you like the “handheld look” then use a selfie stick to remove some of the shake.
If you are using a DSLR or video camera – then you’ll need to have a tripod. These usually have zoom lenses, so you can adjust the angle of the lens and the location.
When purchasing a tripod, I suggest saving a few dollars and purchasing a photo tripod instead of a video tripod. The difference is how easily you can pan or turn the camera. You probably won’t be moving your camera while recording, so start with the more simple gear. Photo tripods usually have a center pole that can raise and lower the camera, which makes small adjustments easier. Be sure to purchase a tripod that is tall enough to record you from eye level or above. If you are 6 feet tall and prefer to stand while filming, then you’ll need a 72″ tripod. But if you are shorter or prefer to sit while recording, you can save a few dollars with a shorter tripod.
Step Five: Choose your microphone
As I mentioned earlier, good sound is actually more important than good video. A good microphone will be more important if you’re space has bad acoustics, but it’s usually good to purchase the best microphone that fits your budget.
Microphone options are very dependent on your choice of video recorder. So be sure to pick a video solution first then buy a microphone to match. For instance, DSLRs have notoriously bad audio options – so you’ll probably want to invest in a separate audio recorder and high end microphones.
Smartphones have an audio input that looks like a common microphone jack – but they are different, so you need to buy a microphone designed to work with your phone
Most PCs will work with USB microphones or microphones with a 1/8″ plug. Most Macs will only work with USB microphones, not those with 1/8″ plugs.
There are three types of microphones that are typically used in video: lavalier, shotgun and “podcaster microphones.”


The last piece of equipment I’ll mention is a teleprompter. This is more advanced, but the price has come down drastically in the last few years, making them an option for your home video studio. A teleprompter projects your script in front of the camera lens – so you can read your script, but the camera can’t see it. It’s possible to use a teleprompter with an external webcam (with tripod adapter,) a smarthphone or a DSLR/video camera. The inexpensive teleprompters require a smarthphone or iPad.
Do you have a home studio? A desk-studio? Are you looking for a little free-advice? Struggling with setting up a video studio? Schedule a free 20 minute chat with me. I’d love to see what you are up to! And be sure to download my equipment list which highlights my favorite gear – breaking it down from beginner to advanced.
[optin-monster-shortcode id=”dknogxpwmprt28f3″]
Brilliantly detailed explanation. The time lapse explainer set up really helped for me to get a visual of what to do and how to place myself in the room. Off to get some decent lights now!
Great info! As I plan my first home studio project I found this to be the clearest and most cost effective demonstration of a “how to…” that makes sense for me.
Thanks
Thanks Ken – Glad to help!